最近我一直很想重新开始进行屏幕录制和教学,所以几个月前我制作了这个免费的打造不烂的用户界面迷你课程。大家似乎很喜欢它,而现在我想做一些更大的视频项目,但出现了一个问题。
🌐 I've been itching to get back into screencasting and teaching lately, so a couple of months ago I put together this free Build UIs that don't suck mini-course. People seemed to like it and now I want to do some bigger video projects, but there was a problem.
我是一名软件开发者。
🌐 I am a software developer.
作为一名软件开发者,就像我需要先编写自己的静态网站生成器才能构建个人网站一样,我需要先构建自己的课程平台才能考虑制作视频课程。
🌐 And as a software developer, much like I need to write my own static site generator before I can build my own personal website, I needed to build my own course platform before I could even think about putting together a video course.
快进六周后,我们刚刚发布了 Compass,这是一个入门工具包,我们使用 Tailwind CSS 和 Next.js 设计,用于发布你自己的在线课程。
🌐 Well fast-forward six weeks later and we just released Compass, a starter kit we designed with Tailwind CSS and Next.js for publishing your own online course.
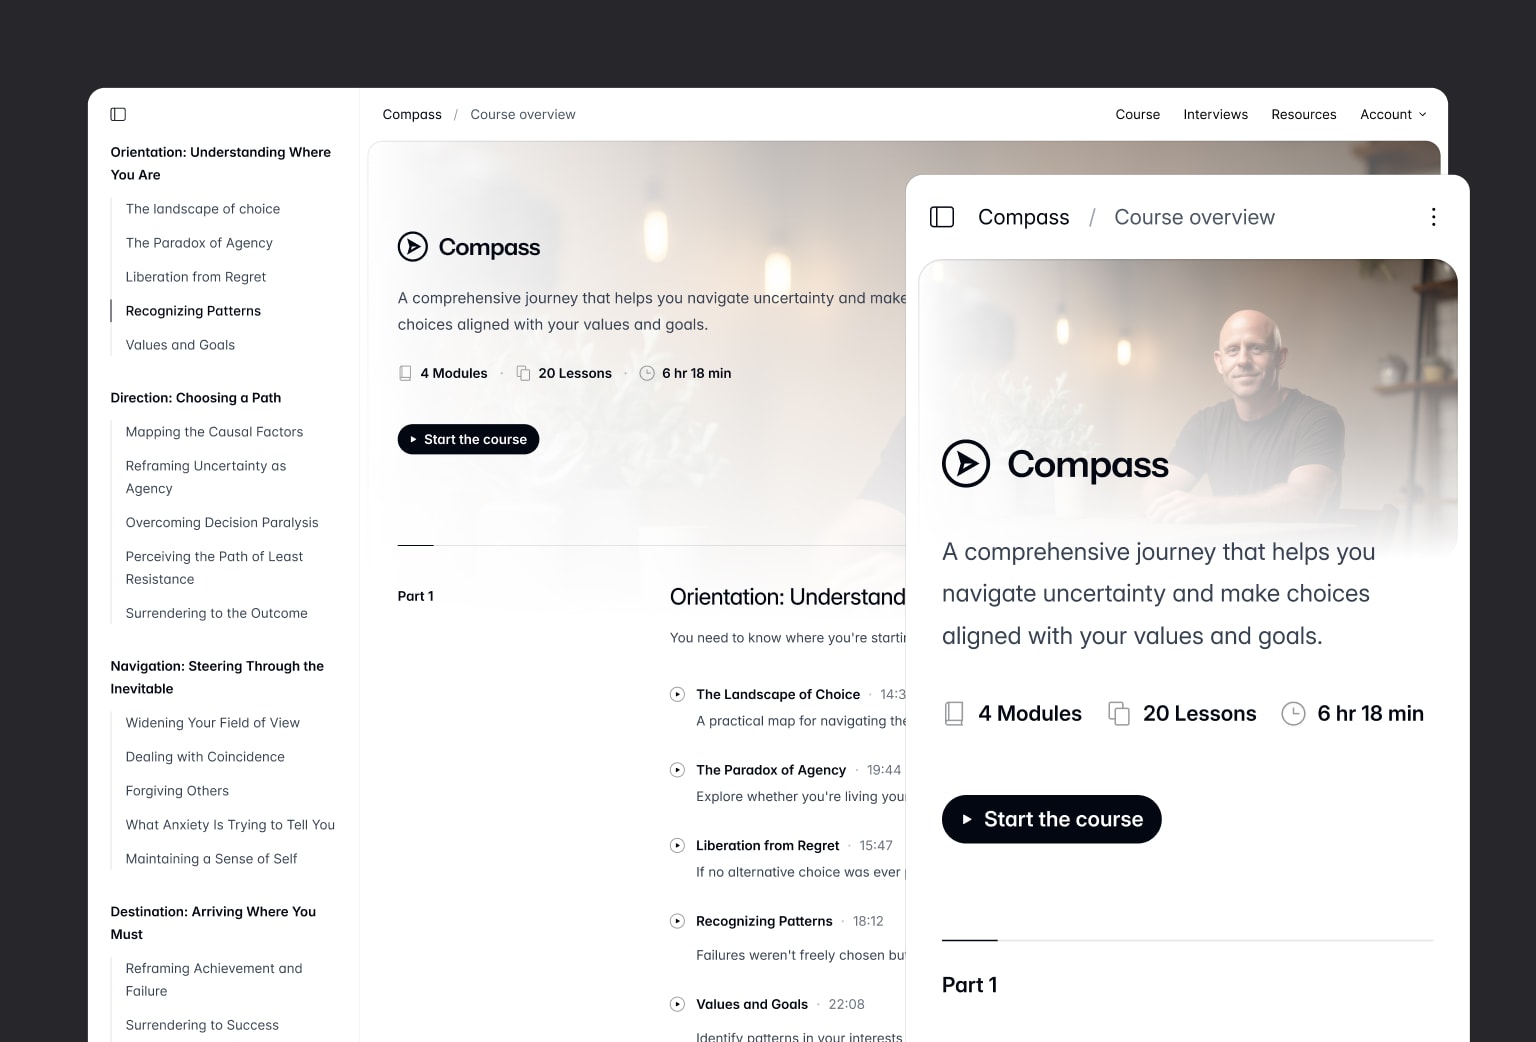
一如既往地查看实时预览以获得完整体验。
🌐 Check out the live preview as always for the full experience.
我们在这个项目上玩得很开心,尝试了许多新工具和技术,并解决了一些有趣的问题。
🌐 We had a lot of fun working on this one, and got to play with a bunch of new tools and technologies and solve some interesting problems.
画中画视频(Picture-in-picture video)
你可能以前没见过,但大多数现代浏览器都支持原生画中画功能。这些 API 允许你将视频弹出到一个独立窗口中,用户可以在浏览网站的同时移动和调整窗口大小。
🌐 You might not have seen it before but most modern browsers have native Picture-in-Picture support. These APIs let you take a video and pop it out into a separate window that the user can move around and resize while still browsing the site.
我们为 Compass 构思了这个想法:如果你开始播放课程视频并向下滚动页面,视频会移动到屏幕右下角,这样你就可以一边观看视频一边阅读页面内容。
🌐 We had this idea for Compass where if you started to play a course video and scrolled down the page, the video would move to the bottom right of the screen so you could still watch it while reading the page content.
我们本希望使用画中画 API 来实现这一功能,但事实证明你不能在滚动时被动触发它们(我猜是出于隐私/安全原因?)——用户必须实际点击某些内容,类似于剪贴板 API 的使用方式。
🌐 We were hoping to use the Picture-in-Picture APIs for this, but it turns out you can't passively trigger them on scroll (for privacy/security reasons I guess?) — the user has to actually click something, similar to the clipboard APIs.
我们最终转而自己做了一个简单的方案,使用 IntersectionObserver、视频事件和一些状态来检测视频何时播放以及是否在屏幕外,并向 <video> 元素添加了数据属性,这样我们就可以用工具类来定位它们:
🌐 We ended up rolling our own simple thing instead, using IntersectionObserver, video events, and a bit of state to detect when the video was playing and offscreen, and added data attributes to the <video> element to so we could target them with utility classes:
<video data-offscreen={isOffscreen ? "" : undefined} data-playing={isPlaying ? "" : undefined} className="data-offscreen:data-playing:fixed data-offscreen:data-playing:right-4 data-offscreen:data-playing:bottom-4"/>我喜欢使用数据属性来实现这种功能,我发现它的代码读起来更像标准的 Tailwind 代码,而不是 JavaScript 中的一堆三元组和条件逻辑。
🌐 I love using data attributes for this sort of thing, find the code reads a lot more like standard Tailwind stuff compared to a bunch of ternaries and conditional logic in JavaScript.
将 VTT 文件解析为文字记录(Parsing VTT files into transcripts)
Compass 中有一个用于访谈的部分,每个访谈都包含页面顶部的视频,以及下方精美的自定义文字记录 UI:
🌐 There's a section in Compass for interviews, which each include a video at the top of the page but also a pretty custom transcript UI below:
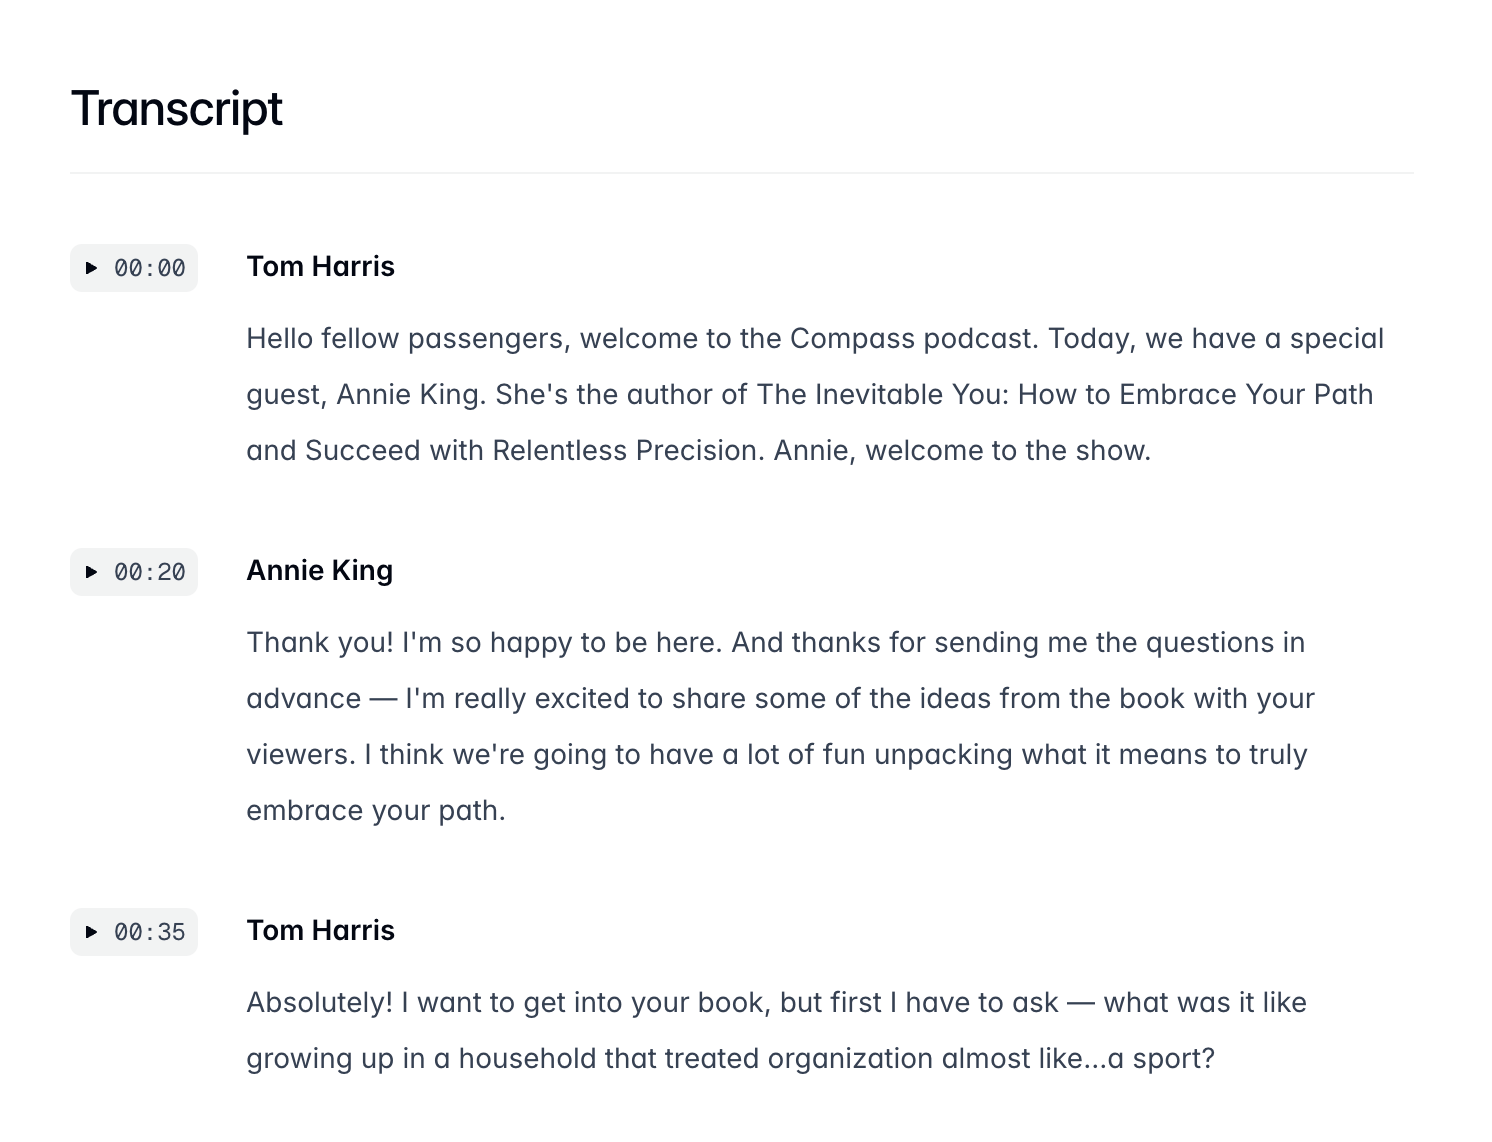
一开始我们并不完全确定应该如何处理这个问题。我们的第一个想法是为这些部分编写一些 React 组件,并将内容直接放入 MDX 文件中,但要指望有人会以这种完全自定义的格式来撰写他们的记录,感觉有点不现实。
🌐 At first we weren't totally sure how we should approach this. Our first idea was to just write some React components for these pieces and throw the content directly into an MDX file, but it felt sort of unrealistic to expect anyone to ever author their transcripts in this totally custom format.
然后我想到使用标准的字幕文件格式,比如SRT。问题是,对于我们的需求,我们需要在文件中编码当前说话者(在上面的截图中是Tom或Annie),而SRT没有编码该信息的标准方式。
🌐 Then I had the idea to use a standard caption file format, like SRT. The problem was that for our needs, we needed to encode the current speaker (Tom or Annie in the screenshot above), and SRT has no standardized way of encoding that information in the file.
我做了更多的研究,最终选择了 WebVTT,它与 SRT 类似,但支持说话人信息,并且为网络使用方便设计。
🌐 I did some more research and eventually landed on WebVTT, which is similar to SRT but does support speaker information, and is conveniently designed for the web.
WEBVTT00:00.000 --> 00:20.000<v Tom Harris>Hello fellow passengers, welcome to the Compass podcast. Today, we have a special guest, Annie King. She's the author of The Inevitable You: How to Embrace Your Path and Succeed with Relentless Precision. Annie, welcome to the show.00:20.000 --> 00:35.000<v Annie King>Thank you! I'm so happy to be here. And thanks for sending me the questions in advance — I'm really excited to share some of the ideas from the book with your viewers. I think we're going to have a lot of fun unpacking what it means to truly embrace your path.00:35.000 --> 00:45.000<v Tom Harris>Absolutely! I want to get into your book, but first I have to ask — what was it like growing up in a household that treated organization almost like...a sport?所以我们把流程接好了,解析来自 .vtt 文件的转录数据,然后遍历这些数据,用 React 渲染成自定义的 UI:
🌐 So we wired things up to parse the transcript data from a .vtt file, and then map over that data to render it as a custom UI with React:
<div> {transcript.map(({ start, speaker, text }) => ( <div key={start} className="col-span-2 grid grid-cols-subgrid items-baseline"> <TimestampButton start={start} videoId="video" className="justify-self-end" /> <div> <p className="text-sm/7 font-semibold text-gray-950 dark:text-white">{speaker}</p> {text.map((p, index) => ( <p key={index} className="mt-2 text-sm/7 whitespace-pre-wrap text-gray-700 dark:text-gray-400"> {p} </p> ))} </div> </div> ))}</div>结果非常酷 - 我可以想象有人只需使用 AI 生成 VTT 格式的文字记录,将其放入项目中,它就会自动渲染在一个精美的自定义 UI 中。
🌐 Turned out pretty cool — I can imagine someone just generating a transcript in VTT format using AI, throwing it into the project and it'll automatically be rendered in a nice custom UI.
扩展 Markdown 图片以支持暗黑模式和布局切换(Extending Markdown images for dark mode and layout shift)
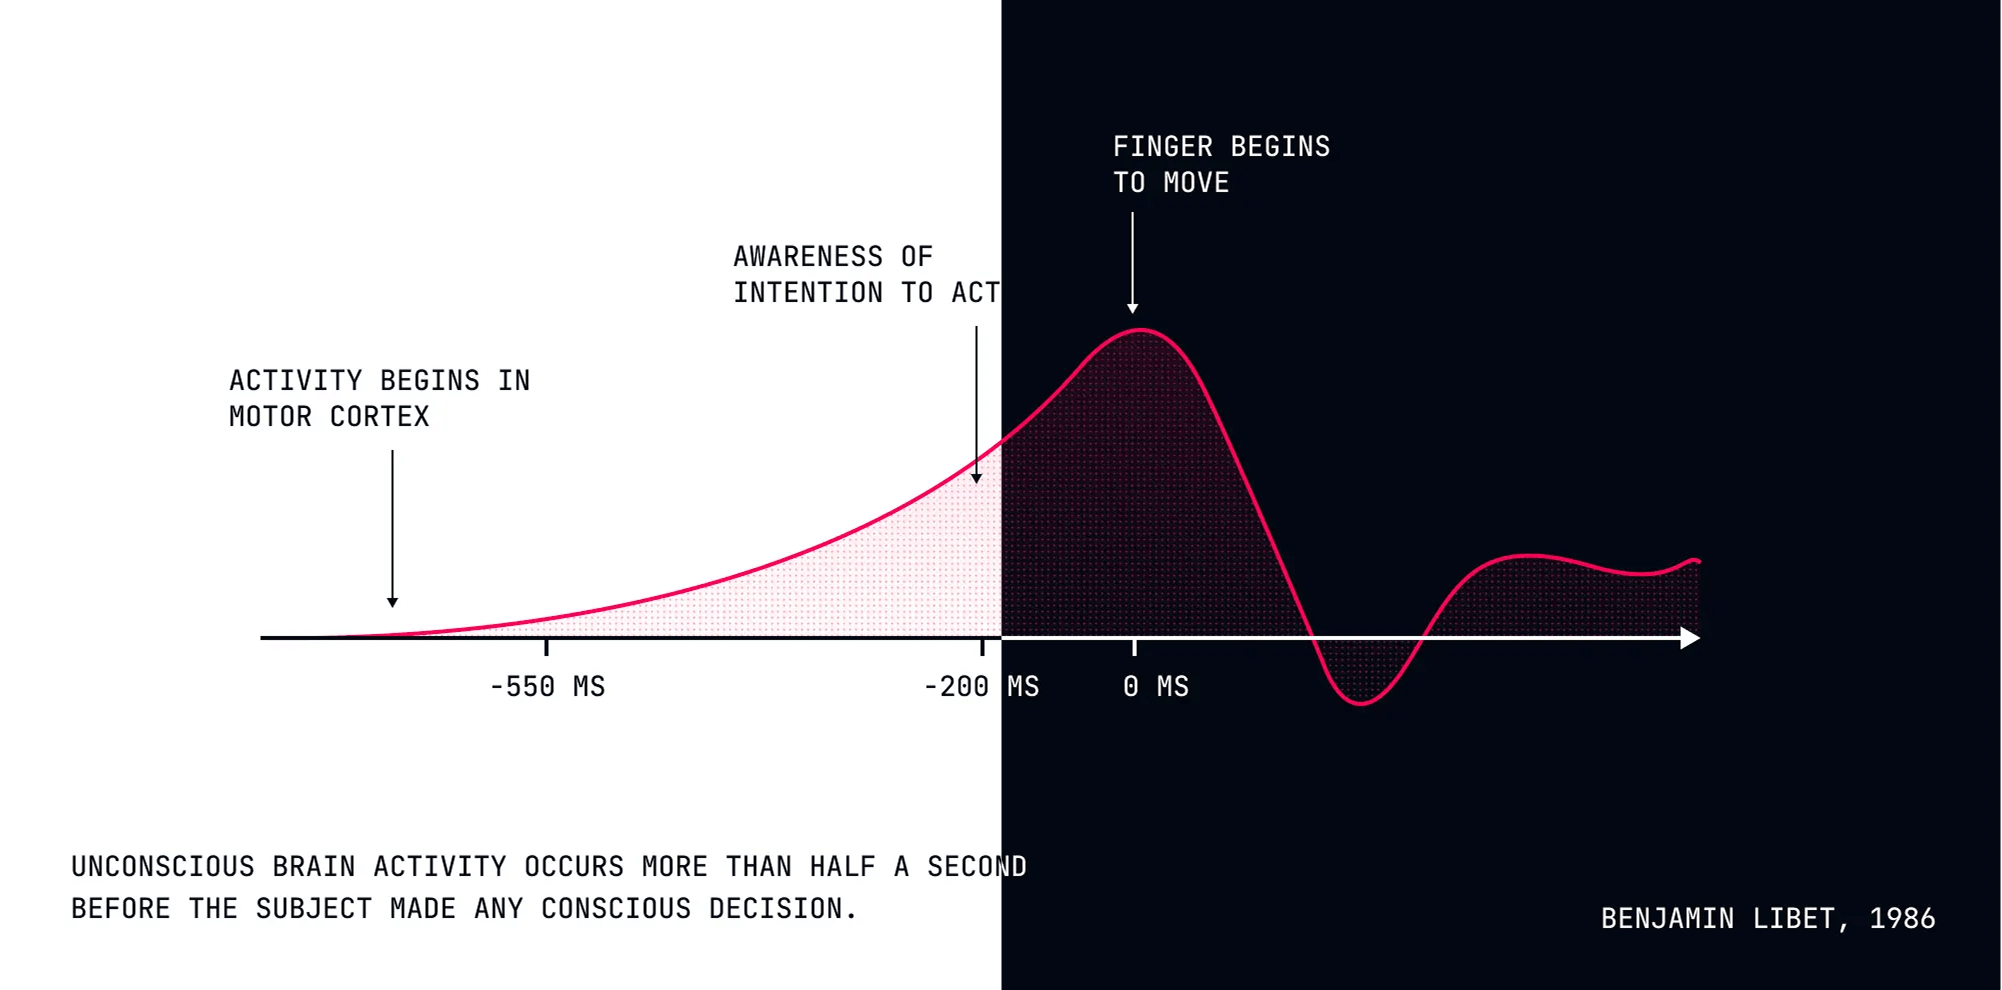
我们为 Compass 构思的示例内容包含许多图表,我们希望它们能够在明夜间模式之间进行适配。
🌐 The example content we came up with for Compass includes a lot of diagrams that we wanted to adapt between light and dark mode.
你可以用很多不同的方式来做这种事情(例如,<picture> 标签本身就支持),但我们真的希望内容文件尽可能保持像原生 Markdown 一样的感觉。
🌐 You can do this sort of thing a ton of different ways (the <picture> tag supports it natively for example), but we really wanted to keep the content files feeling as much like vanilla Markdown as possible.
所以我们想出了在图片 URL 中使用 {scheme} 占位符的想法,我们会根据需要将其动态替换为 light 或 dark,从而根据用户的色彩方案加载正确的图片:
🌐 So we came up with this idea of a {scheme} placeholder in the image URL that we replace with light or dark dynamically, loading the correct image based on the user's color scheme:
## The Myth of Free WillYour brain makes decisions before you are even aware of them.现在,基础图片组件将根据当前的配色方案自动渲染 neuro-proof.light.png 或 neuro-proof.dark.png。如果你只是想在两者中使用相同的图片,只需完全不在 URL 中包含 {scheme} 就可以了。
🌐 Now the underlying image component will automatically render neuro-proof.light.png or neuro-proof.dark.png depending on the current color scheme. And if you just want to use the same image in both, just don't include {scheme} in the URL at all.
我们还想避免内容布局的变化,现在你可以很容易地做到这一点,只需确保给你的图片设置 width 和 height 属性,这样浏览器就可以计算宽高比,并在图片加载时预留空间。
🌐 We also wanted to avoid layout shift in the content, which you can do pretty easily these days by ensuring you give your images width and height attributes so the browser can compute the aspect ratio and reserve space for the image when it loads.
在 Markdown 的图片语法中没有标准的表达方式,但经过一番研究,我们在 Obsidian 中发现了一些先例。
🌐 There's no standard way to express this in Markdown's image syntax, but after a bit of research we discovered some precedent in Obsidian.
Obsidian 将图片尺寸添加到 alt 文本中,如下所示:
🌐 Obsidian tacks the image dimensions on to the alt text, like this:
## The Myth of Free WillYour brain makes decisions before you are even aware of them.因此,我们使用了一个自定义的 MDX 组件,以相同的格式提取尺寸,并将其添加到图片中,以确保内容加载时布局不会发生偏移。
🌐 So we used a custom MDX component to pull out the dimensions using the same format, and add those to the image to make sure there's no layout shift as the content loads.
就是这样——这就是 Compass!一如既往,对于任何拥有 Tailwind Plus 许可的人来说,它都是免费的更新,所以去 下载代码库,随意探索,尽情玩吧。
🌐 So there you go — that's Compass! As always it's a free update for anyone with a Tailwind Plus license, so go and download the codebase, poke around, and have fun with it.
如果你还没有 Tailwind Plus 许可证,可以考虑获取一个!购买许可证是支持我们开发 Tailwind CSS 的最佳方式,而且里面有很多非常有用的内容。
🌐 If you don't already have a Tailwind Plus license, think about getting one! Picking one up is the best way to support our work on Tailwind CSS and there's a ton of useful stuff in there.
期待在接下来的几个月里,我自己也能用这个模板完成一些项目!
🌐 Looking forward to using this template for some upcoming projects myself in the next couple of months!