我本不确定这是否会发生,但我们做到了——我们发布了一个包含 text-shadow 工具的 Tailwind CSS 版本。
🌐 I wasn't sure it would ever happen but we did it — we released a version of Tailwind CSS that includes text-shadow utilities.
Tailwind CSS v4.1 已经发布,它带来了全新的实用工具、变体和开发者体验改进,将帮助你(或者你的大型语言模型,你这个胆小鬼)构建更出色的互动体验。
🌐 Tailwind CSS v4.1 is here and it's packed with new utilities, variants, and developer experience improvements that will help you (or your LLM, you coward) build even better interactive experiences.
以下是本次发布的所有精彩内容:
🌐 Here's all the best stuff we got into this release:
- 新的
text-shadow-*工具 —— 距它们首次被浏览器支持大约只有二十年。 - 使用
mask-*工具对元素进行遮罩 — 使用图片和渐变通过新的符合人体工学的 API 对元素进行遮罩。 - 改进了对旧版浏览器的兼容性 — 我们让旧版浏览器的降级更加平滑,同时仍然能利用支持现代特性的浏览器功能。
- 使用
overflow-wrap的细粒度文本换行 — 即使是用户输入的最长德语单词,也能保护你的布局完整性。 - 彩色
drop-shadow支持 — 真的记不清以前为什么没有这个功能,但现在我们有了。 - 针对
pointer-*和any-pointer-*的目标输入设备 — 明确地调整你的设计以适应触控设备,而不是仅依赖视口大小。 - 将项目对齐到最后的基线 — 使用新的
items-baseline-last和self-baseline-last工具类,将 flex 或 grid 项目对齐到最后一行文本的基线。 - 使用
safe对齐保持内容可见 — 在 flex 和 grid 布局中居中内容,即使空间不足也不会消失。 - 使用
@source not忽略特定路径 — 明确忽略无关的大目录,进一步加快构建速度。 - 使用
@source inline(…)将特定工具列入白名单 — 强制 Tailwind 包含不在你的源文件中的类。 - 一组其他新变体——包括
noscript、user-valid、inverted-colors等。
这些都是很酷的新功能,但在发行说明里还有一些其他的小细节,你也可能想看看。
🌐 That's all the cool stuff, but there's a few other little things hiding in the release notes that you might want to check out too.
通过从 npm 安装最新版本的 tailwindcss 来升级你的项目:
🌐 Upgrade your projects by installing the latest version of tailwindcss from npm:
npm install tailwindcss@latest @tailwindcss/cli@latestnpm install tailwindcss@latest @tailwindcss/vite@latestnpm install tailwindcss@latest @tailwindcss/postcss@latest新的 text-shadow-* 工具(New text-shadow-* utilities)
至少在过去六年里,我们一直计划添加文本阴影,今天终于实现了。
🌐 We've been threatening to add text shadows for at least the last six years and today they are finally here.
我们在默认主题中添加了五种文本阴影,从 text-shadow-2xs 到 text-shadow-lg。它们在使标题在复杂背景中突出时特别有用:
🌐 We've added five text shadows to the default theme, from text-shadow-2xs to text-shadow-lg. They are particularly useful for making headings stand out against a busy background:
The quick brown fox jumps over the lazy dog.
The quick brown fox jumps over the lazy dog.
The quick brown fox jumps over the lazy dog.
The quick brown fox jumps over the lazy dog.
The quick brown fox jumps over the lazy dog.
<p class="text-shadow-2xs ...">The quick brown fox...</p><p class="text-shadow-xs ...">The quick brown fox...</p><p class="text-shadow-sm ...">The quick brown fox...</p><p class="text-shadow-md ...">The quick brown fox...</p><p class="text-shadow-lg ...">The quick brown fox...</p>你可以使用 text-shadow-<color> 工具更改阴影的颜色。例如,你可以通过在深色文字上使用小白色阴影来创建一种浮雕效果:
🌐 You can change the color of the shadow using the text-shadow-<color> utilities. For instance, you can create a sort of embossed effect by using a small white shadow on dark text:
<button class="text-sky-950 text-shadow-2xs text-shadow-sky-300 ...">Book a demo</button><button class="text-gray-950 dark:text-white dark:text-shadow-2xs ...">See pricing</button>如果你只是想调整文本阴影的透明度而不改变颜色,你可以直接在文本阴影尺寸工具(如 text-shadow-lg)上使用透明度修饰符。
🌐 If you just want to adjust the opacity of a text shadow without changing the color, you can slap an opacity modifier directly on text shadow size utilities like text-shadow-lg.
例如,text-shadow-lg/50 等同于同时设置 text-shadow-lg 和 text-shadow-black/50:
🌐 For example, text-shadow-lg/50 is the same as setting text-shadow-lg and text-shadow-black/50 at the same time:
The quick brown fox jumps over the lazy dog.
The quick brown fox jumps over the lazy dog.
The quick brown fox jumps over the lazy dog.
<p class="text-shadow-lg ...">The quick brown fox...</p><p class="text-shadow-lg/20 ...">The quick brown fox...</p><p class="text-shadow-lg/30 ...">The quick brown fox...</p>查看 text-shadow 文档以获取更多详细信息。
🌐 Check out the text-shadow docs for more details.
使用 mask-* 工具掩盖元素(Mask elements with the mask-* utilities)
现代 CSS 最酷的功能之一是能够将图片和渐变用作遮罩——基本上是利用图片的透明度来隐藏元素的某些部分:
🌐 One of the coolest features of modern CSS is the ability to use images and gradients as masks - basically using the opacity of an image to hide certain parts of an element:
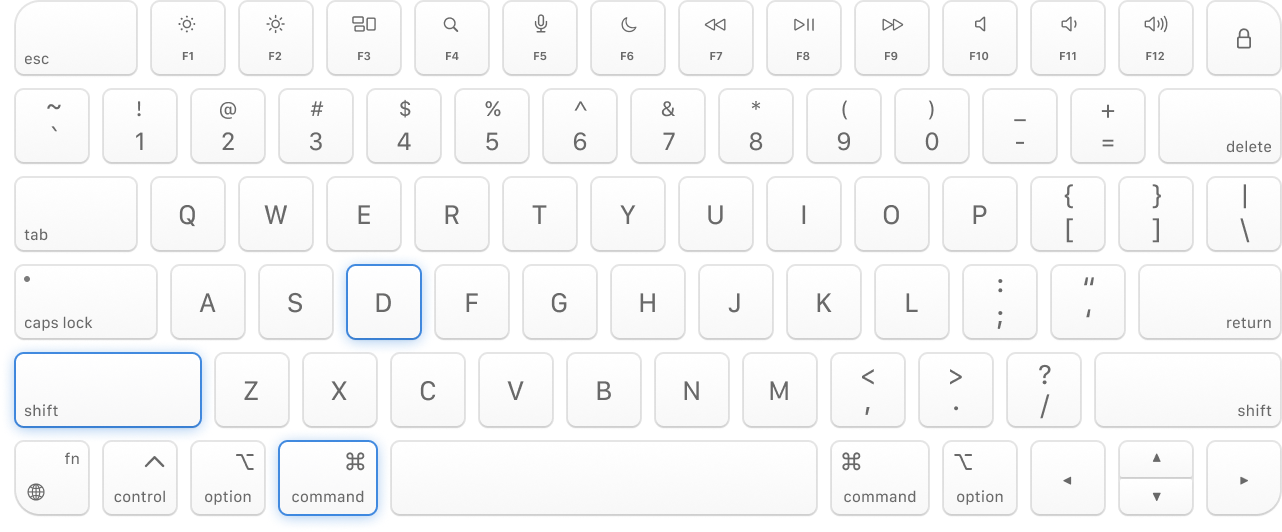
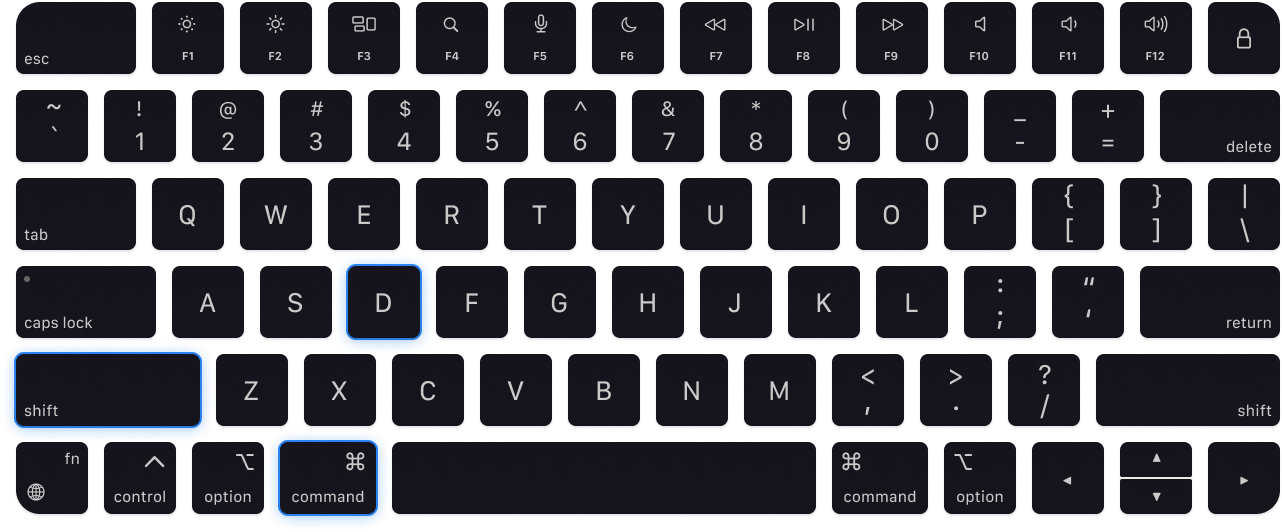
Speed
Built for power users
Work faster than ever with our keyboard shortcuts
<div class="mx-auto flex items-center p-16 max-sm:p-8"> <img src="/img/keyboard.png" class="mask-radial-from-transparent mask-radial-from-15% mask-radial-to-black mask-radial-to-55% mask-radial-at-right ..." /> <div class="font-medium"> <p class="font-mono text-xs text-blue-500 uppercase dark:text-blue-400">Speed</p> <p class="mt-2 text-base text-gray-700 dark:text-gray-300">Built for power users</p> <p class="mt-1 text-sm leading-relaxed text-balance text-gray-500"> Work faster than ever with our keyboard shortcuts </p> </div></div>因为你可以使用任何 background-image 作为掩码,合理的做法是复制 bg-* 工具,以便它们共享相同的 API。这个方法的问题在于,你经常想要将多个掩码组合在一起,而 bg-* 工具却不可组合。
🌐 Because you can use any background-image as a mask, the logical thing to do was to copy the bg-* utilities so they share the same API. The problem with that approach is you often want to combine multiple masks together and the bg-* utilities are not composable.
因此,我们创建了一套新的工具来处理 mask-image,这些工具是可组合的,并专为遮罩使用场景设计。例如,你可以使用 mask-b-from-<value> 和 mask-t-to-<value> 这样的工具,为元素的单侧添加线性渐变遮罩:
🌐 So instead, we created a new set of utilities to work with mask-image that are composable and purpose-built for the masking use case. For example, you can use utilities like mask-b-from-<value> and mask-t-to-<value> to add a linear gradient mask to a single side of an element:
mask-t-from-50%
mask-r-from-30%
mask-l-from-50% mask-l-to-90%
mask-b-from-20% mask-b-to-80%
<div class="mask-t-from-50% bg-[url(/img/mountains.jpg)] ..."></div><div class="mask-r-from-30% bg-[url(/img/mountains.jpg)] ..."></div><div class="mask-l-from-50% mask-l-to-90% bg-[url(/img/mountains.jpg)] ..."></div><div class="mask-b-from-20% mask-b-to-80% bg-[url(/img/mountains.jpg)] ..."></div>比起费力计算需要使用的确切渐变色,思考要遮盖哪一侧更为自然。
🌐 It's more natural to think about which side you want to mask, rather than trying to work out the exact gradient you need to use.
渐变蒙版工具也是可组合的,因此你可以将径向、圆锥和线性渐变组合在一起,以创建更复杂的蒙版:
🌐 The gradient mask utilities are also composable, so you can combine radial, conic and linear gradients together to create more complex masks:
<div class="mask-b-from-50% mask-radial-[50%_90%] mask-radial-from-80% bg-[url(/img/mountains.jpg)] ..."></div><div class="mask-r-from-80% mask-b-from-80% mask-radial-from-70% mask-radial-to-85% bg-[url(/img/mountains.jpg)] ..."></div>掩码是一种非常强大的技术,而这个 API 的功能远不止我们在这里能涵盖的范围。要了解新工具的完整说明,请查看文档。
🌐 Masking is a super powerful technique and there's a lot more to the API than we can cover here. For a full breakdown of the new utilities, check out the documentation.
改进了与旧版浏览器的兼容性(Improved compatibility with older browsers)
我们全力以赴地利用 Tailwind CSS v4.0 的现代平台功能,打造出最好的框架,并尽可能延长此版本的使用寿命。
🌐 We went all-in on modern platform features with Tailwind CSS v4.0 to make the best framework we could, and give this version the longest shelf-life possible.
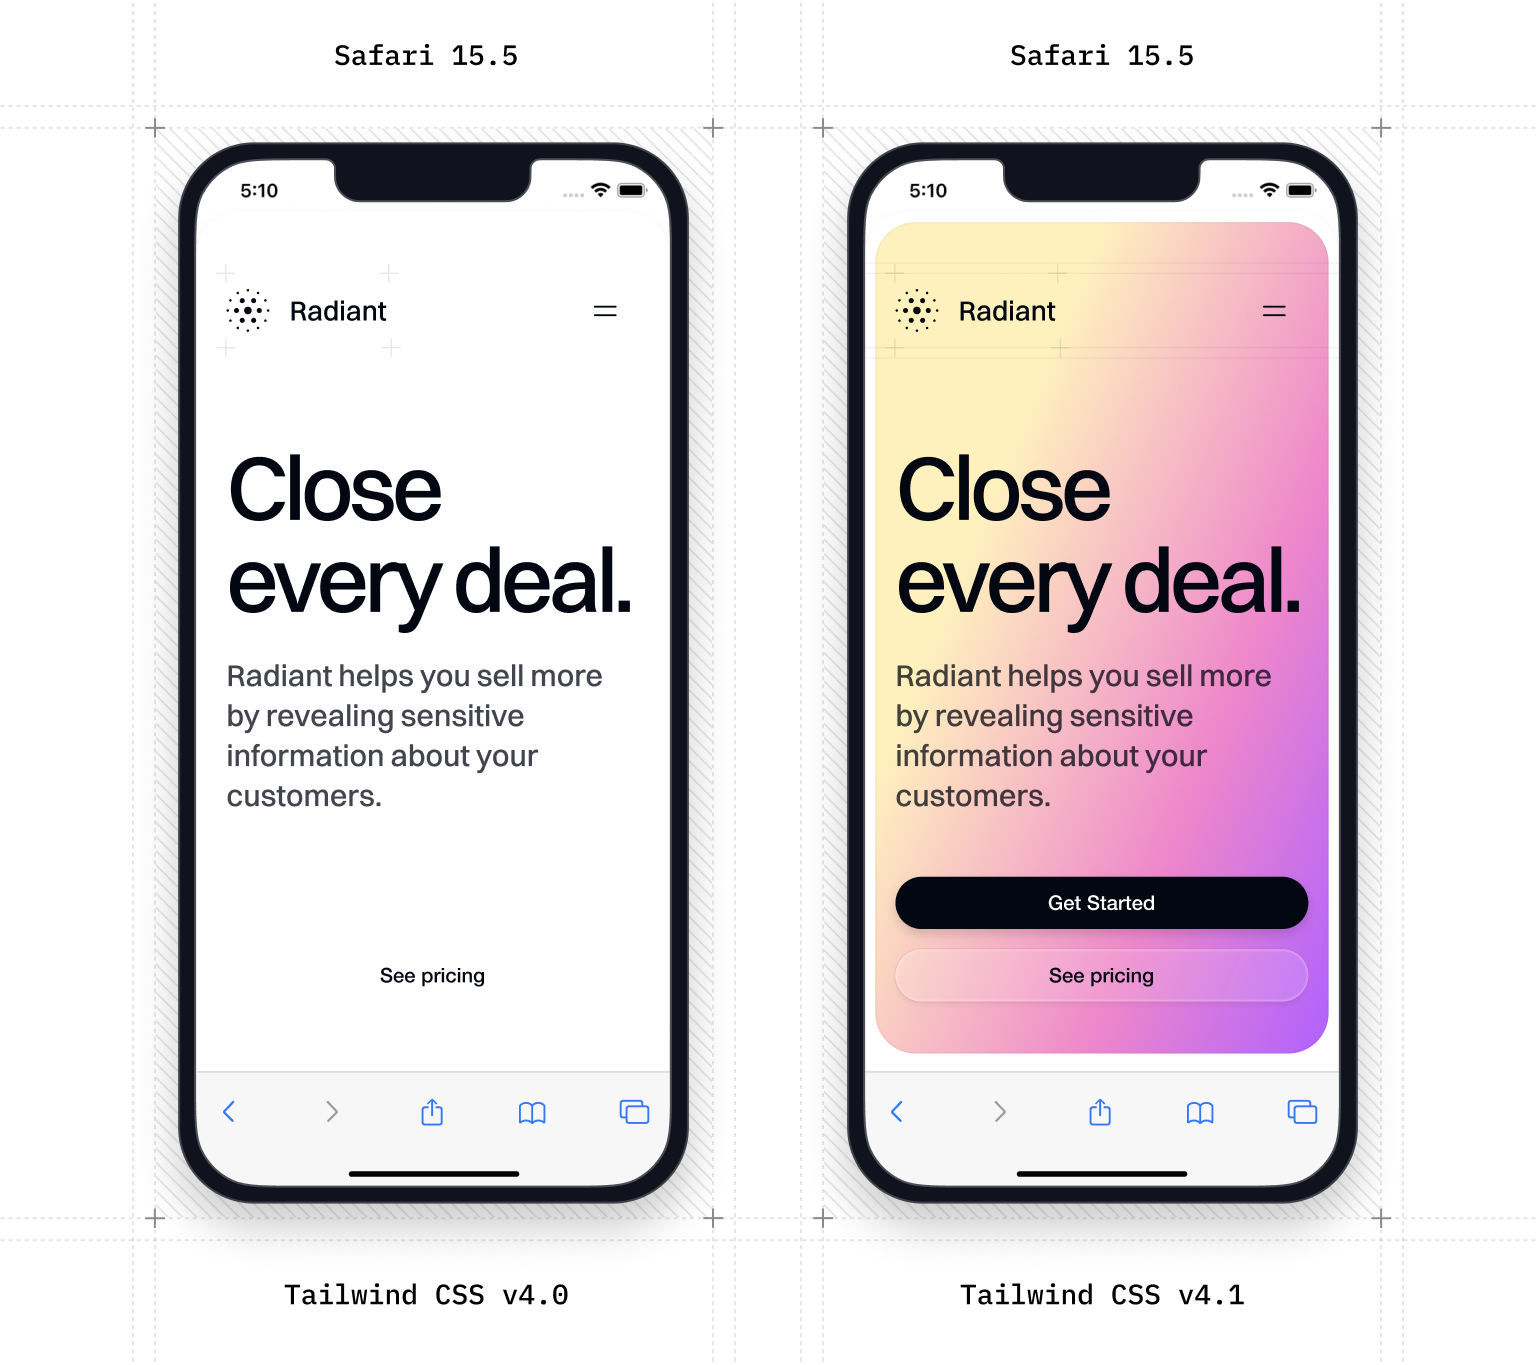
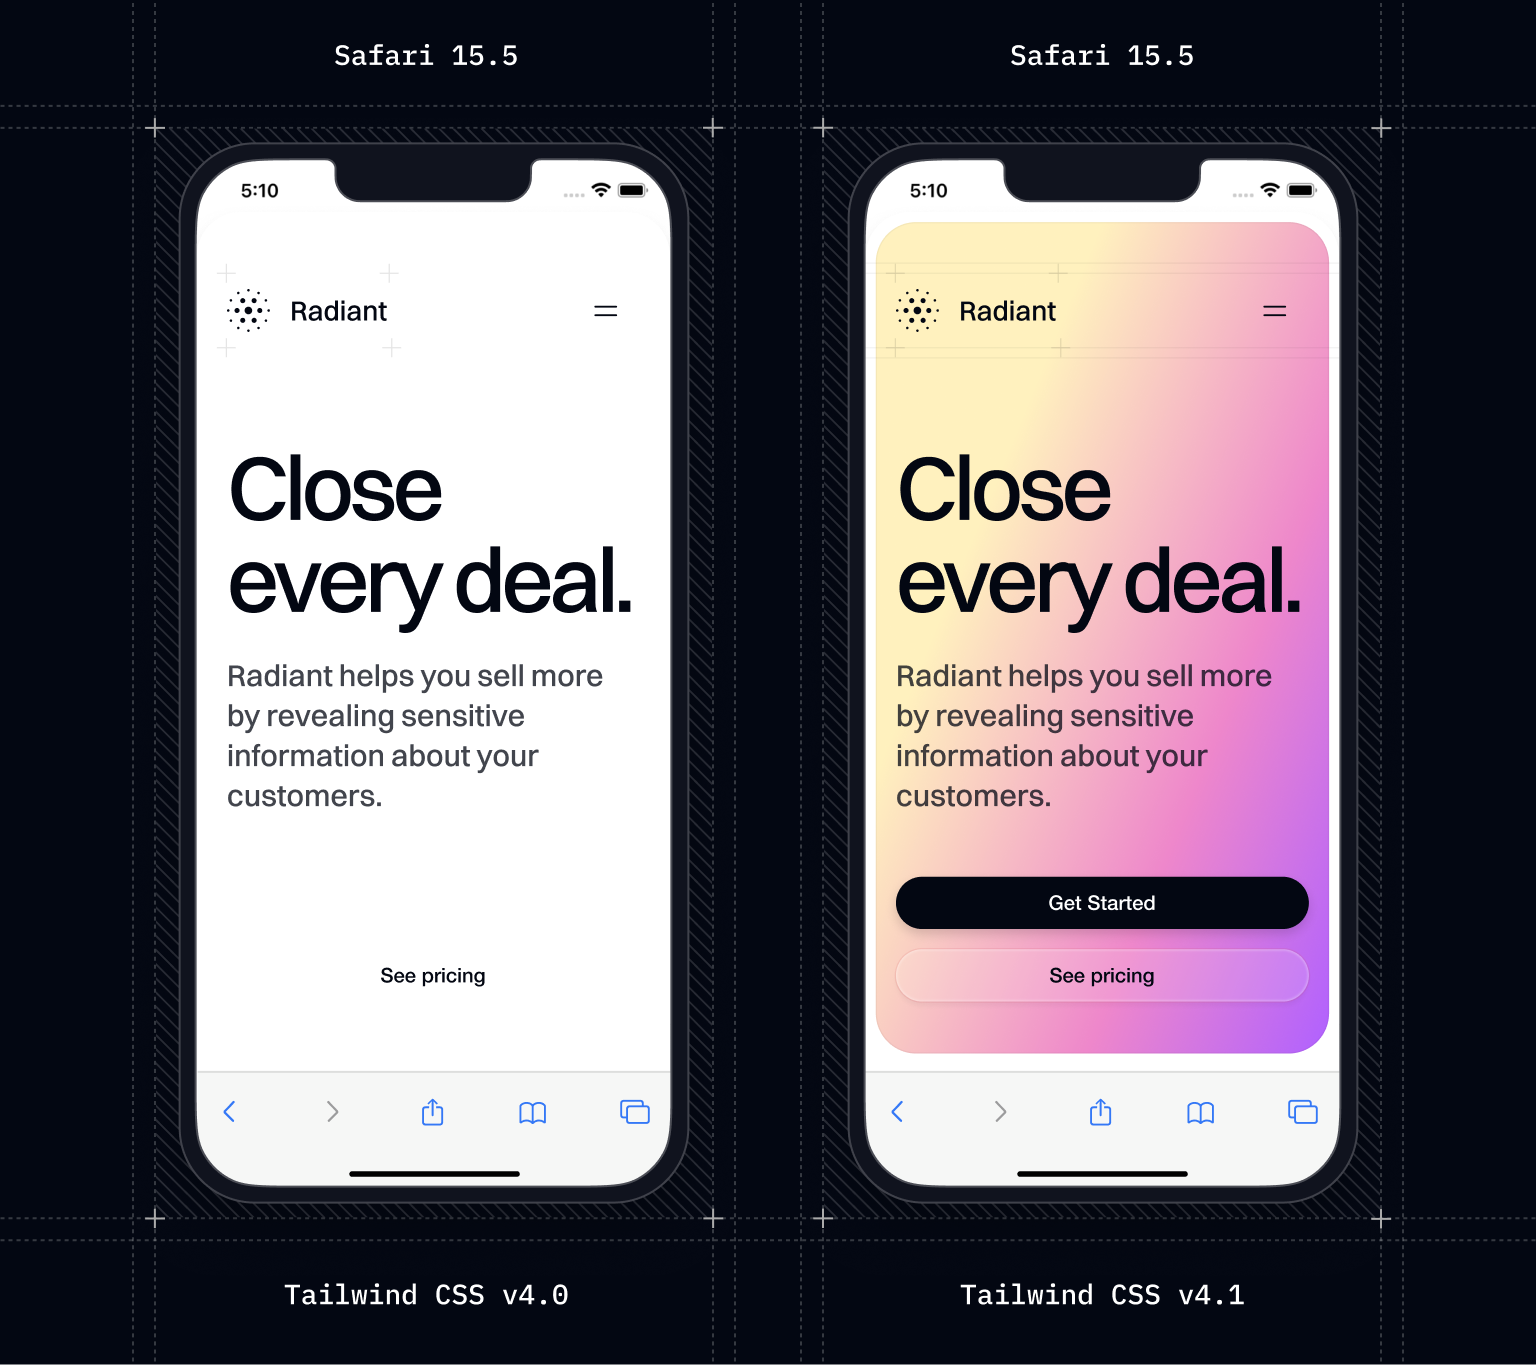
遗憾的是,其中一些功能在旧版浏览器中性能下降非常严重,甚至连颜色和阴影等基本功能对于使用 Safari 15 的旧版 iPhone 或 iPad 访问的用户都可能完全无法渲染。
🌐 Unfortunately some of those features degrade really poorly in older browsers, to the point where even basic things like colors and shadows might not render at all for someone visiting from an old iPhone or iPad that's stuck on Safari 15.
对于 Tailwind CSS v4.1,我们投入了大量精力来开发和测试我们自己框架特有的回退机制,以使你的网站在旧版浏览器中渲染最佳效果,即使一些非常现代的功能仍然表现不佳。
🌐 For Tailwind CSS v4.1, we put a bunch of effort into coming up with and testing our own framework-specific fallbacks to make your sites render as best as possible in older browsers, even if some super modern things still don't behave quite the same.
以下是我们在此过程中设法改进的事项列表发布:
🌐 Here's a list of the things we've managed to improve in this release:
oklab中定义的颜色现在可以在旧版本的 Safari 中显示- 依赖于使用
@property定义的自定义属性的功能(如阴影、变换、渐变等)现在可以在旧版本的 Safari 和 Firefox 中使用 - 使用透明度修饰符的颜色现在可以在旧版浏览器中使用内联回退渲染
- 使用显式插值方法的渐变在不受支持时会回退到浏览器默认值。
Tailwind CSS v4 仍然是为像 Safari 16.4 及更高版本这样的现代浏览器而设计的,并且仍然依赖许多现代特性来确保一切运行完美,但至少现在你的网站可以在旧浏览器中渲染并可用,即使在某些特定情况下,某些阴影颜色可能会有所不同。
🌐 Tailwind CSS v4 is still designed for modern browsers like Safari 16.4 and up and still depends on a lot of modern features for everything to work perfectly, but at least now your sites will render and be usable in older browsers, even if in certain specific situations the odd shadow color be different.
要了解 Tailwind CSS v4 中有关浏览器兼容性的所有信息,你可以阅读完整的 浏览器兼容性文档。
🌐 To learn everything you need to know about browser compatibility in Tailwind CSS v4, you can read the full browser compatibility documentation.
使用 overflow-wrap 进行细粒度文本换行(Fine-grained text wrapping with overflow-wrap)
新的 overflow-wrap 工具可以让你控制文本在元素内的换行方式。wrap-break-word 工具对于可能破坏布局的长单词或 URL 特别有用:
🌐 The new overflow-wrap utilities let you control how text wraps within an element. The wrap-break-word utility is especially useful for long words or URLs that might otherwise break your layout:
The longest word in any of the major English language dictionaries is pneumonoultramicroscopicsilicovolcanoconiosis, a word that refers to a lung disease contracted from the inhalation of very fine silica particles, specifically from a volcano; medically, it is the same as silicosis.
<p class="wrap-break-word">The longest word in any of the major...</p>唯一一种情况不会像你预期的那样表现是位于弹性容器内,这时候你可能想使用新的 wrap-anywhere 工具类。
🌐 The one case where this doesn't quite behave like you'd expect is inside a flex container and that's where you probably want to use the new wrap-anywhere utility instead.
它类似于 wrap-break-word,但在计算元素的内在尺寸时允许单词中间换行,从而无需在子元素上设置 min-width: 0:
🌐 It's similar to wrap-break-word, but it allows mid-word line breaks when calculating the intrinsic size of the element, replacing the need to set min-width: 0 on the child element:
wrap-break-word

Jay Riemenschneider
jason.riemenschneider@vandelayindustries.com
wrap-anywhere
Jay Riemenschneider
jason.riemenschneider@vandelayindustries.com
<div class="flex max-w-sm"> <img class="size-16 rounded-full" src="/img/profile.jpg" /> <div class="wrap-break-word"> <p class="font-medium">Jay Riemenschneider</p> <p>jason.riemenschneider@vandelayindustries.com</p> </div></div><div class="flex max-w-sm"> <img class="size-16 rounded-full" src="/img/profile.jpg" /> <div class="wrap-anywhere"> <p class="font-medium">Jay Riemenschneider</p> <p>jason.riemenschneider@vandelayindustries.com</p> </div></div>也就差不多这么多了,如果你想用稍微不同的方式再阅读一遍,这里有 overflow-wrap 的文档。
🌐 There's not much more to it than that, but here's the overflow-wrap documentation if you want to read it again in slightly different words.
彩色 drop-shadow 支持(Colored drop-shadow support)
在我们开发 text-shadow 支持的同时,我们想不如顺便添加一个我们一直没有实现的功能:彩色投影。
🌐 While we were building out text-shadow support we thought we might as well add another feature we never got around to implementing: colored drop shadows.
现在你可以使用类似 drop-shadow-indigo-500 和 drop-shadow-cyan-500/50 的工具来更改投影的颜色:
🌐 Now you can use utilities like drop-shadow-indigo-500 and drop-shadow-cyan-500/50 to change the color of a drop shadow:
drop-shadow-cyan-500/50
drop-shadow-sky-500/50
drop-shadow-indigo-500/50
<svg class="fill-cyan-500 drop-shadow-xl drop-shadow-cyan-500/50 ...">...</svg><svg class="fill-blue-500 drop-shadow-xl drop-shadow-blue-500/50 ...">...</svg><svg class="fill-indigo-500 drop-shadow-xl drop-shadow-indigo-500/50 ...">...</svg>其实也没什么更多内容,但无论如何这里是drop-shadow文档。
🌐 There isn't much more to it but here's the drop-shadow documentation anyway.
针对 pointer-* 和 any-pointer-* 的目标输入设备(Target input devices with pointer-* and any-pointer-*)
新的 pointer-fine 和 pointer-coarse 变体允许你根据用户是使用鼠标设备还是触摸屏设备来对某些内容进行不同的样式设置。
🌐 The new pointer-fine and pointer-coarse variants let you style something differently depending on whether the user is using a device with a mouse or using a touchscreen.
使用 pointer-fine 针对高精度指点设备,如鼠标和触控板;使用 pointer-coarse 针对精度较低的设备,如触摸屏:
🌐 Use pointer-fine to target precise pointing devices like mouses and trackpads, and pointer-coarse to target devices lower precision like touchscreens:
尝试在开发者工具中模拟触摸设备以查看更改
<fieldset aria-label="Choose a memory option"> <div class="flex items-center justify-between"> <div>RAM</div> <a href="#"> See performance specs </a> </div> <div class="mt-4 grid grid-cols-6 gap-2 pointer-coarse:mt-6 pointer-coarse:grid-cols-3 pointer-coarse:gap-4"> <label class="p-2 pointer-coarse:p-4 ..."> <input type="radio" name="memory-option" value="4 GB" className="sr-only" /> <span>4 GB</span> </label> <!-- ... --> </div></fieldset>如果你在使用手机,你会看到应用了 pointer-coarse 样式,使触控目标更大、更容易点击。如果你在使用桌面电脑,你会看到应用了 pointer-fine 样式,使触控目标更小、更精确。
🌐 If you're on your phone, you'll see the pointer-coarse styles applied, which make the touch targets larger and easier to hit. If you're on a desktop, you'll see the pointer-fine styles applied, which make the touch targets smaller and more precise.
any-pointer-* 变体的工作方式相同,但它们不是仅检查用户的 主要 指点设备,而是检查是否有 任何 指点设备匹配。因此,例如,any-pointer-coarse 即使用户同时连接了鼠标,也会在带触摸屏的注意本电脑上匹配。
🌐 The any-pointer-* variants work the same way but instead of just checking the user's primary pointing device, they check if any pointing device matches. So any-pointer-coarse will match on a laptop with a touchscreen for a example, even if the user also has a mouse connected.
将项目与最后一个基线对齐(Align items to the last baseline)
使用弹性或网格布局时,有时需要将某些内容与文本最后一行的基线对齐,而不是与容器的末尾对齐。
🌐 When working with flex or grid layouts, sometimes you need to align something to the baseline of the last line of text rather than the end of the container.
新的 items-baseline-last 工具就是做这个的:
🌐 The new items-baseline-last utility does just that:

Working on the future of astronaut recruitment at Space Recruit.

A multidisciplinary designer.
<div class="grid grid-cols-[1fr_auto] items-baseline-last"> <div> <img src="img/spencer-sharp.jpg" /> <h4>Spencer Sharp</h4> <p>Working on the future of astronaut recruitment at Space Recruit.</p> </div> <p>spacerecruit.com</p></div>我们还添加了 self-baseline-last,当你只需要对齐单个项目而不是 flex 或 grid 容器中的所有项目时使用。
🌐 We've also added self-baseline-last for when you need to align just a single item, and not all items in the flex or grid container.
使用 safe 对齐保持内容可见(Keep content visible with safe alignment)
有没有遇到过当容器太小时,居中对齐的内容在两个方向上溢出的问题?现在你不需要使用容器查询来在不同大小下切换对齐方式了。
🌐 Ever had center aligned content overflow in both directions when the container got too small? Now you don't have to use a container query to switch the alignment at different sizes.
新的 safe 对齐工具将在容器开始溢出时将对齐方式更改为 start,因此它只会在一个方向上溢出。
🌐 The new safe alignment utilities will change the alignment to start when the container starts to overflow, so it only overflows in one direction.
调整容器大小以查看对齐行为
justify-center
- Sales
- Marketing
- SEO
- Analytics
- Design
- Strategy
- Growth
- UX/UI
justify-center-safe
- Sales
- Marketing
- SEO
- Analytics
- Design
- Strategy
- Growth
- UX/UI
<ul class="flex justify-center gap-2 ..."> <li>Sales</li> <li>Marketing</li> <li>SEO</li> <!-- ... --></ul><ul class="flex justify-center-safe gap-2 ..."> <li>Sales</li> <li>Marketing</li> <li>SEO</li> <!-- ... --></ul>这些工具适用于 Flexbox 和网格布局,并且适用于所有对齐属性。
🌐 These utilities work with both flexbox and grid layouts, and are available for all alignment properties.
忽略带有 @source not 的特定路径(Ignore specific paths with @source not)
有时你需要特意排除代码库中的某些部分,使其不被 Tailwind 扫描。现在你可以使用 @source not 来在扫描类名时忽略特定路径:
🌐 Sometimes you need to specifically exclude some parts of your code base from being scanned by Tailwind. Now you can use @source not to ignore specific paths when scanning for class names:
@import "tailwindcss";@source not "./src/components/legacy";当你的项目中有大量文件,但只想扫描其中的特定子集时,这很有用。
🌐 This is useful when you have a large number of files in your project, but only want to scan a specific subset of them.
使用 @source inline(…) 将特定工具列入白名单(Safelist specific utilities with @source inline(…))
如果你需要确保 Tailwind 生成在内容文件中不存在的某些类名,你可以使用 @source inline() 强制生成它们:
🌐 If you need to make sure Tailwind generates certain class names that don’t exist in your content files, you can force them to be generated by using @source inline():
@import "tailwindcss";@source inline("underline");.underline { text-decoration: underline;}这相当于以前版本 Tailwind 中的 safelist 配置选项,但现在你可以在 CSS 文件中使用它,而不是在配置文件中使用。
🌐 This is the equivalent of the safelist configuration option in previous versions of Tailwind, but now you can use it in your CSS files instead of your config file.
源输入是 brace-expanded 格式,因此你可以一次生成多个类。例如,要生成带有悬停变体的所有红色色调,你可以在源输入中添加一个范围:
🌐 The source input is brace-expanded, so you can generate multiple classes at once. For example, to generate all the red shades with hover variants, you can add a range to the source input:
@import "tailwindcss";@source inline("{hover:,}bg-red-{50,{100..900..100},950}");.bg-red-50 { background-color: var(--color-red-50);}.bg-red-100 { background-color: var(--color-red-100);}.bg-red-200 { background-color: var(--color-red-200);}/* ... */.bg-red-800 { background-color: var(--color-red-800);}.bg-red-900 { background-color: var(--color-red-900);}.bg-red-950 { background-color: var(--color-red-950);}@media (hover: hover) { .hover\:bg-red-50:hover { background-color: var(--color-red-50); } /* ... */ .hover\:bg-red-950:hover { background-color: var(--color-red-950); }}这将生成从100到900、每100递增的红色阴影,以及50和950的阴影。它还为每个这些类添加了hover:变体。
你还可以使用 @source inline() 搭配 not 修饰符来排除特定的类不被生成:
🌐 You can also use @source inline() with the not modifier to exclude specific classes from being generated:
@import "tailwindcss";@source not inline("container");这将特别防止生成 container 类,即使在你的源文件中检测到 container 这个词。
🌐 This will specifically prevent the container class from being generated, even if the word container is detected in your source files.
欲了解更多详情,请查看在源文件中检测类文档。
🌐 For more details, check out the detecting classes in source files documentation.
一系列其他新变体(A bunch of other new variants)
使用 details-content 的更美观手风琴(Prettier accordions with details-content)
虽然你总是可以为 <details> 元素的子元素添加样式,但一直无法为内容容器本身添加样式。
🌐 While you could always add styles to the children of a <details> element, it's been impossible to style the content container itself.
新的 details-content 变体针对内容容器,这对于相对于 <summary> 元素定位内容容器非常有用:
🌐 The new details-content variant targets the content container which is useful for positioning the content container relative to the <summary> element:
Why do they call it Ovaltine?
The mug is round. The jar is round. They should call it Roundtine.
<details class="rounded-lg border border-transparent p-6 details-content:mt-3 details-content:-ml-0.5" open> <summary class="text-sm leading-6 font-semibold text-gray-900 select-none dark:text-white"> Why do they call it Ovaltine? </summary> <div class="border-gray-200 bg-gray-50 py-3 pl-3 dark:border-white/10 dark:bg-gray-800/50 ..."> <p>The mug is round. The jar is round. They should call it Roundtine.</p> </div></details>目标 inverted-colors 模式(Target inverted-colors mode)
使用 inverted-colors 变体来在用户在操作系统中启用反色方案时有条件地添加样式:
🌐 Use the inverted-colors variant to conditionally add styles when the user has enabled an inverted color scheme in their OS:
<div class="shadow-xl inverted-colors:shadow-none ..."> <!-- ... --></div>这对于防止启用反色时黑色阴影变成白色等情况很有用。
🌐 This is useful for things like preventing black shadows being turned white when inverted colors are enabled.
新的 noscript 变种(New noscript variant)
是的,有些人会禁用 JavaScript,现在你可以告诉他们你的应用在没有它的情况下无法运行。noscript 变体允许你在禁用 JS 时有条件地应用样式:
🌐 Yes, some people disable JavaScript and now you can tell them your app doesn't work without it. The noscript variant lets you conditionally apply styles when JS is disabled:
<div class="hidden noscript:block">Please enable JavaScript to use this app.</div>你本来就可以用 <noscript> 标签做到这一点,但现在你也可以用 CSS 来实现,而 Tailwind 让你可以在 HTML 中编写 CSS,所以……对,就这样。
🌐 You could already do this with the <noscript> tag but now you can do it with CSS too, which Tailwind lets you write in your HTML, so… yeah.
使用 user-valid 和 user-invalid 进行更好的表单验证(Better form validation with user-valid and user-invalid)
有没有试过使用 :invalid 伪类,结果页面一加载就充满了红色的无效状态,而用户甚至还没触碰你的表单?
🌐 Ever tried the :invalid pseudo-class only for the page to be full of red invalid states as soon as it loads, before the user has even touched your form?
新的 user-valid 和 user-invalid 变体试图通过仅在用户实际与控件交互后才应用与验证相关的样式来解决这个问题:
🌐 The new user-valid and user-invalid variants try to solve this problem, by only applying validation-related styling after the user has actually interacted with the controls:
<input required class="border user-valid:border-green-500" /><input required class="border user-invalid:border-red-500" />就是这样,这就是 Tailwind CSS v4.1!使用 npm 更新到最新版本,并今天就开始尝试吧:
🌐 So that's it, that's Tailwind CSS v4.1! Update to the latest version using npm and start playing with it today:
npm install tailwindcss@latest @tailwindcss/cli@latestnpm install tailwindcss@latest @tailwindcss/vite@latestnpm install tailwindcss@latest @tailwindcss/postcss@latest期待看到你用这些新功能构建出什么!
🌐 Looking forward to seeing what you build with the new features!